
If you’re reading this, chances are you know the frustration of back pain all too well. That nagging ache that makes it hard to sleep. The sharp twinge when you bend down. The constant discomfort that shadows your every movement.
You’re not alone. Back pain affects 80% of adults at some point in their lives, making it one of the most common reasons people miss work or seek medical care.
Here’s the good news: yoga poses for back pain can be remarkably effective—but not in the way most people think.
At Blue Osa, we’ve helped hundreds of people overcome chronic back pain through our Applied Yoga Anatomy and Muscle Activation (AYAMA™) approach. Unlike traditional yoga that focuses on stretching, AYAMA teaches you to activate and strengthen the muscles that support your spine.
In this guide, you’ll discover the best yoga poses for back pain relief, why they work, and how to practice them safely for lasting results.
Why Yoga Works for Back Pain: The Science
Before we dive into specific yoga poses for back pain, it’s important to understand why yoga is so effective for back pain relief.

The Problem: Weak Muscles, Not Tight Muscles
Most people think back pain comes from tight muscles that need stretching. This is backwards.
The truth: Back pain usually results from weak, inactive muscles that force other muscles to compensate. Those compensating muscles become tight as they try to protect your spine from instability.
When you stretch tight back muscles without addressing the underlying weakness, you make the problem worse.
The Solution: Muscle Activation
The yoga poses for back pain in this guide focus on muscle activation—engaging and strengthening the specific muscles that support your spine.
This approach:
- Restores the brain-muscle connection
- Builds stability throughout the spine
- Reduces pain by addressing the root cause
- Prevents future injury
Research supports this: Studies show that strengthening exercises are more effective for chronic back pain than passive stretching alone.
Important Safety Guidelines Before You Begin
While yoga poses for back pain can be highly therapeutic, it’s crucial to practice safely.
When to See a Doctor First
Consult a healthcare professional before practicing these yoga poses for back pain if you experience:
- Severe pain that doesn’t improve with rest
- Pain that radiates down your leg (sciatica)
- Numbness, tingling, or weakness in your legs
- Loss of bowel or bladder control
- Pain after a fall or injury
- Fever accompanying back pain
- Unexplained weight loss with back pain
General Safety Principles
When practicing yoga poses for back pain:
- Move slowly and with control
- Focus on breath—never hold your breath
- Stop immediately if pain increases
- Start with shorter holds and build gradually
- Quality matters more than quantity
- Listen to your body, not your ego
Remember: Some discomfort during strengthening is normal, but sharp pain is a warning sign. Know the difference.
Understanding Different Types of Back Pain
Not all back pain is the same. The best yoga poses for back pain depend on where and why you’re hurting.
Lower Back Pain (Lumbar Region)
Common causes:
- Weak core muscles
- Tight hip flexors
- Poor posture
- Sedentary lifestyle
Best yoga poses for back pain in this area:
- Sphinx Pose
- Apanasana (Dynamic Knees to Chest)
- Bridge Pose
- Cat-Cow
Upper Back Pain (Thoracic Region)
Common causes:
- Poor posture (slouching)
- Weak upper back muscles
- Prolonged computer/phone use
- Stress and tension
Best yoga poses for back pain in this area:
- Locust Pose
- Sphinx Pose
- Downward-Facing Dog
- Bird / Dog Yoga Pose
Middle Back Pain
Common causes:
- Weak stabilizing muscles
- Poor ergonomics
- Repetitive movements
Best yoga poses for back pain in this area:
- Cat-Cow
- Downward-Facing Dog
- Locust Pose
Now let’s explore each of these therapeutic yoga poses for back pain in detail.
7 Best Yoga Poses for Back Pain Relief
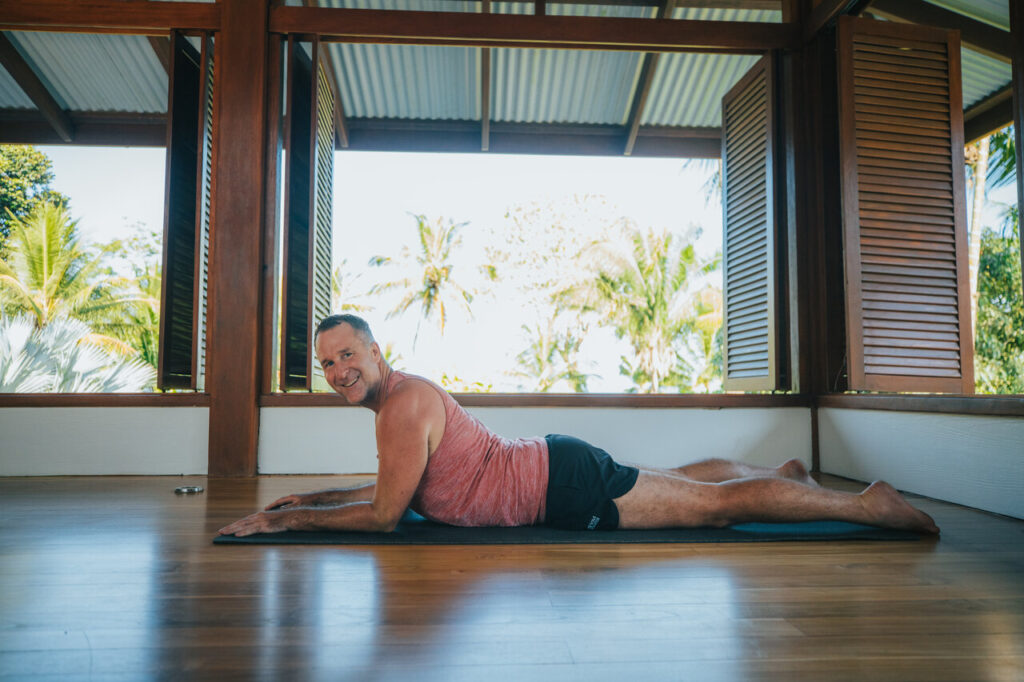
1. Sphinx Pose (Salamba Bhujangasana) – The Herniated Disc Helper
Sphinx Pose is one of the most therapeutic yoga poses for back pain, especially if you have herniated discs. Research and clinical evidence suggest this gentle backbend may actually help reduce disc herniation size and promote healing.
Why This Pose Helps Back Pain
Sphinx Pose is exceptional for back pain because it:
- Promotes the natural lumbar curve (lordosis) that supports the spine
- Stimulates the sacral-lumbar arch for proper alignment
- Strengthens the spine without straining wrists
- Opens the chest, lungs, and shoulders to improve posture
- May help herniated discs by creating a gentle suction effect
- Is accessible for beginners with wrist injuries or pain
This is a variation of Cobra Pose that offers the same benefits without pressure on the wrists, making it ideal for those with wrist issues.
Evidence for Herniated Discs
Medical research supports Sphinx Pose for disc issues. Total Ortho Sports Medicine specifically recommends modified sphinx pose to “lower mechanical stress on the lumbar segments and improve segmental mobility” for herniated disc patients (source).
Additionally, studies on the McKenzie Method—which uses sphinx-type extension exercises—found “significant reductions in disc herniation size along with decreased pain and disability” (source). The gentle extension “pushes the disc pressure forward, creating suction. This can also pull the disc material into the disc.”
Research also shows that “spontaneous regression of herniated disc tissue can occur” with conservative treatment, with regression rates of 70% for disc extrusion and 41% for disc protrusion (source).
How to Do Sphinx Pose
Setup:
- Lie flat on your stomach, face down
- Extend your legs straight behind you, about hip-width apart
- Point your toes
The Movement:
- Bring your elbows directly under your shoulders
- Rest on your forearms, which should be parallel to each other
- Place palms flat on the floor
- Press forearms into the floor and begin to lift head and chest
- Draw your shoulder blades down your back
- Roll your outer thighs inward to lengthen your lower back
- Gaze forward, keeping the back of your neck long
- Hold for 5-10 breaths
Critical Points for This Pose
DO:
- Keep elbows directly under shoulders (not too far forward)
- Press firmly through forearms to engage back muscles
- Keep legs active and engaged
- Maintain length in the back of your neck
DON’T:
- Let your shoulders creep up toward your ears
- Crunch your lower back excessively
- Allow elbows to splay out to the sides
- Collapse your chest between your shoulders
Common Mistakes to Avoid
Mistake #1: Elbows Too Far Forward
This reduces the backbend’s effectiveness. Keep elbows under shoulders.
Mistake #2: Inactive Legs
Engage your legs by rolling outer thighs inward and pressing the tops of your feet into the mat.
Mistake #3: Shoulders by Ears
Actively draw shoulder blades down your back to keep shoulders away from ears.
Breathing Instructions
- Inhale: As you lift your chest and lengthen your spine
- Exhale: As you draw your shoulder blades down and engage your back
- Continue breathing deeply, using each inhale to lift a bit more
Modifications
If you feel compression in your lower back:
- Walk your elbows slightly forward
- Don’t lift as high
- Place a blanket under your pelvis
If your shoulders are tight:
- Widen your forearms slightly
- Don’t try to lift as high initially
To deepen the pose:
- Walk elbows slightly back (only if lower back feels good)
- Lift chest higher while maintaining length in lower back
2. Apanasana (Dynamic Knees to Chest Pose) – AYAMA Style
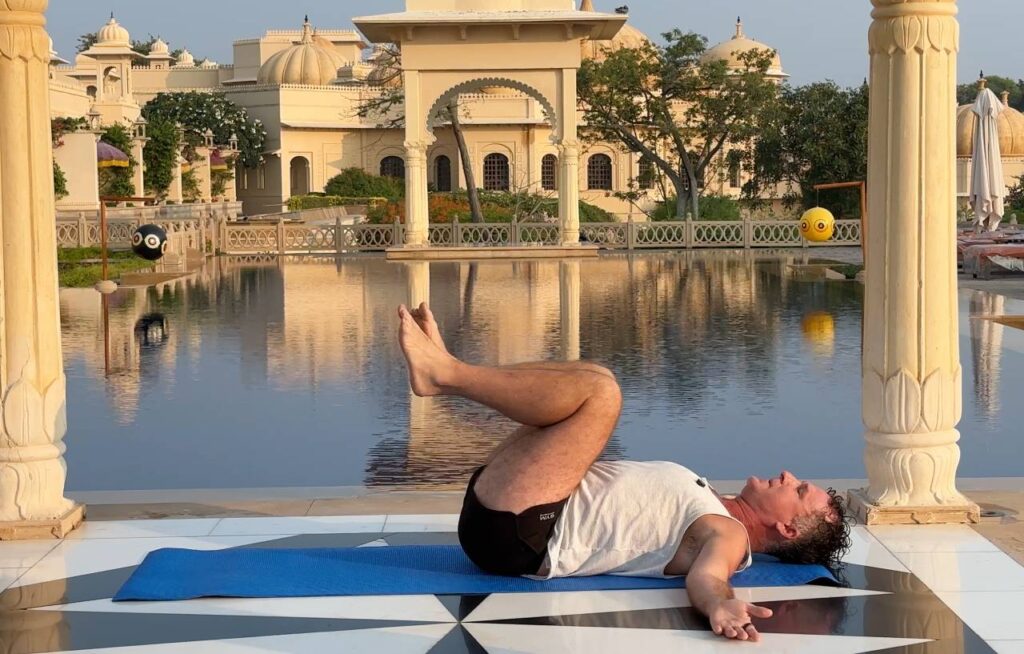
This is one of the most effective yoga poses for back pain because it activates your core and hip flexors—the foundation of a stable, pain-free spine.
Unlike the passive version where you pull your knees to your chest (which actually shuts down the muscles), this AYAMA approach builds real strength.
Why This Pose Helps Back Pain
Dynamic Apanasana is exceptional for lower back pain because it:
- Activates trunk flexors (abdominal muscles)
- Strengthens hip flexors (psoas and iliacus)
- Builds core stability to support the spine
- Improves brain-muscle connection in the core
- Relieves pressure on the lower back
When these muscles are strong and active, they take pressure off your lower back, eliminating pain at its source.
How to Do Dynamic Apanasana (AYAMA Style)
Setup:
- Lie flat on your back on your yoga mat
- Extend your legs straight on the floor
- Place your arms at your sides, palms down
- Keep your head neutral on the floor
The Movement:
- Engage your core and slowly bring both knees toward your chest
- Hold for 6 seconds with knees as close to chest as possible
- Keep your arms at your sides the ENTIRE time (don’t grab your knees!)
- Slowly lower your feet back to the starting position
- Repeat 6 times total
Critical Points for This Pose
DO:
- Keep arms at your sides throughout
- Engage your abdominal muscles to pull knees up
- Move slowly and with control
- Breathe steadily (don’t hold your breath)
- Focus on muscle activation, not range of motion
DON’T:
- Grab your knees and pull them to your chest (this shuts down the muscles)
- Use momentum or swing your legs
- Hold your breath
- Force your knees closer than your muscles can actively bring them
Common Mistakes to Avoid
Mistake #1: Using Your Hands
If you grab your knees and pull, you bypass the muscles that need strengthening. The whole point is to make those muscles work.
Mistake #2: Moving Too Fast
Quick movements use momentum instead of muscle activation. Slow, controlled movement builds strength.
Mistake #3: Arching Your Lower Back
Keep your lower back gently pressed toward the floor as you bring your knees up.
Breathing Instructions
- Inhale: As you bring your knees toward your chest
- Hold: Maintain steady breathing during the 6-second hold
- Exhale: As you lower your legs back down
Modifications
If you can’t bring knees all the way to chest:
- Bring them as far as your muscles can actively pull them
- Focus on the muscle activation, not the distance
- You’ll improve with practice
If you have neck tension:
- Place a small folded towel under your head for support
This dynamic version of Apanasana embodies the AYAMA philosophy: building strength through muscle activation, not passive stretching. It’s one of the most powerful yoga poses for back pain when practiced correctly.
3. Cat-Cow (Marjaryasana-Bitilasana)

Cat-Cow is one of the most gentle and accessible yoga poses for back pain, making it perfect for beginners and those with acute back pain.
Why This Pose Helps Back Pain
Cat-Cow is excellent for back pain because it:
- Massages and stretches the entire spine through gentle flexion and extension
- Improves spinal flexibility and mobility
- Warms up the back before other poses
- Increases circulation to spinal discs
- Relieves tension in the neck, shoulders, and torso
- Helps with coordination of breath and movement
- Is very low-risk with minimal strain
This flowing movement keeps your back limber and can provide immediate relief from stiffness.
How to Do Cat-Cow
Setup:
- Start in tabletop position
- Place wrists directly under shoulders
- Place knees directly under hips
- Keep spine neutral, head in line with spine
The Movement (Cow Pose):
- Inhale: Drop your belly toward the floor
- Lift your chest and tailbone toward the ceiling
- Draw shoulder blades together
- Gaze slightly upward (don’t crunch your neck)
The Movement (Cat Pose):
- Exhale: Draw your navel toward your spine
- Round your back toward the ceiling
- Tuck your tailbone under
- Drop your head toward the floor
- Tuck your chin to your chest
Repeat this fluid movement for 6-8 rounds, moving with your breath.
Critical Points for This Pose
DO:
- Move slowly and mindfully
- Initiate movement from your pelvis, not your head
- Keep shoulders over wrists throughout
- Coordinate breath with movement
- Make the movement smooth and flowing
DON’T:
- Rush through the movements
- Crunch your neck in either direction
- Hold your breath
- Let your shoulders collapse
Common Mistakes to Avoid
Mistake #1: Leading with the Head
Movement should originate from your pelvis/tailbone, with your head following naturally.
Mistake #2: Moving Too Fast
This is a mindful flow, not a race. Match your movement to your breath.
Mistake #3: Holding the Poses
Cat-Cow is meant to be a continuous, flowing movement. Don’t pause at the top or bottom.
Breathing Instructions
- Inhale: Belly drops, chest lifts (Cow)
- Exhale: Belly lifts, back rounds (Cat)
- One full breath cycle = one complete Cat-Cow
- Aim for 6-8 complete cycles
Modifications
If you have wrist pain:
- Come down to forearms
- Place a folded towel under your wrists for cushioning
- Make fists instead of flat palms
If you have knee sensitivity:
- Place a folded blanket under your knees
- Try the pose seated in a chair
If you’re pregnant:
- Skip the Cat (rounded back) phase in later pregnancy
- Focus only on Cow pose with gentle extension
4. Downward-Facing Dog (Adho Mukha Svanasana)

One of the most recognized yoga poses for back pain, Downward-Facing Dog works the entire body while specifically targeting the spine and back muscles.
Why This Pose Helps Back Pain
Downward Dog is excellent for back pain because it:
- Lengthens the entire spine from tailbone to neck
- Strengthens shoulders, arms, and legs to support proper posture
- Stretches the hamstrings which often contribute to lower back pain
- Decompresses the spine through the inverted position
- Builds full-body strength that protects the back
How to Do Downward-Facing Dog
Setup:
- Start in tabletop position (hands and knees)
- Place hands shoulder-width apart, fingers spread wide
- Align knees directly under hips
The Movement:
- Tuck your toes under
- Lift your hips toward the ceiling as you straighten your legs
- Point your tailbone toward the sky
- Slowly work to straighten your legs (bend knees if needed)
- Stretch your heels toward the ground (they don’t need to touch)
- Keep arms straight with head between upper arms
- Tuck chin slightly to keep neck in line with spine
- Hold for 5-8 breaths
Critical Points for This Pose
DO:
- Keep fingers spread wide and press firmly through palms
- Engage your core to support your lower back
- Keep weight evenly distributed between hands and feet
- Allow your spine to lengthen rather than rounding
DON’T:
- Lock your elbows or knees
- Let your shoulders collapse toward your ears
- Force your heels to the ground if hamstrings are tight
- Hold your breath
Common Mistakes to Avoid
Mistake #1: Rounded Upper Back
Many people round their upper back to try to get heels down. Instead, bend your knees slightly and focus on lengthening the spine.
Mistake #2: Shoulders by Ears
Actively press your shoulder blades down your back, away from your ears.
Mistake #3: Locked Joints
Keep a micro-bend in elbows and knees to protect joints and engage muscles.
Breathing Instructions
- Inhale: As you press into your hands and lengthen your spine
- Exhale: As you draw your navel toward your spine and engage your core
- Maintain steady, deep breathing throughout the hold
Modifications
If you have tight hamstrings:
- Keep a generous bend in your knees
- Heels don’t need to touch the ground
If you have wrist pain:
- Come down to forearms for Dolphin Pose instead
- Use a folded mat under heels of hands
If you have shoulder issues:
- Don’t hold as long
- Focus on proper form over duration
5. Locust Pose (Salabhasana)

Locust Pose is one of the gentler yoga poses for back pain that strengthens the entire posterior chain—crucial for eliminating back pain and preventing future issues.
Why This Pose Helps Back Pain
Locust Pose is exceptional for back pain because it:
- Strengthens the entire back body including erector spinae muscles
- Activates glutes which often contribute to lower back pain when weak
- Improves posture by strengthening muscles that counteract slouching
- Prepares you for deeper backbends safely
- Aids digestion which can relieve gas, constipation, and related back tension
- Builds endurance in back muscles to support the spine all day
How to Do Locust Pose
Setup:
- Lie face-down on your mat
- Place arms at your sides, palms facing up toward ceiling
- Rest your forehead on the floor
- Bring your big toes to touch, heels slightly apart
The Movement:
- Simultaneously lift your head, chest, arms, and legs off the floor
- Keep big toes touching
- Reach your fingertips toward your feet (arms stay straight)
- Gaze forward to lengthen the back of your neck
- Keep your pelvis and lower belly in contact with the ground
- Hold for 5-10 breaths
- Lower down slowly and rest
Critical Points for This Pose
DO:
- Lift from your back muscles, not by straining your neck
- Keep your legs internally rotated (big toes touching)
- Engage your glutes and hamstrings
- Breathe steadily throughout
DON’T:
- Crunch your neck back to lift higher
- Let your legs splay apart
- Hold your breath
- Lift so high that your pelvis leaves the floor
Common Mistakes to Avoid
Mistake #1: Leading with the Head
Lift from your upper back muscles, letting your head follow. Don’t crane your neck.
Mistake #2: Neglecting the Legs
Your legs should be as active as your upper body. Engage hamstrings and glutes.
Mistake #3: Holding Tension
Keep your shoulders relaxed, away from your ears, even while lifting.
Breathing Instructions
- Inhale: As you lift everything off the floor
- Hold: Maintain steady breathing during the pose
- Exhale: As you lower back down
Modifications
If you’re a beginner:
- Start by lifting just your upper body, keeping legs on the ground
- Or lift just legs, keeping upper body down
- Progress to full pose as you build strength
If you have lower back sensitivity:
- Don’t lift as high
- Place a folded blanket under your pelvis for cushioning
6. Bridge Pose (Setu Bandha Sarvangasana)
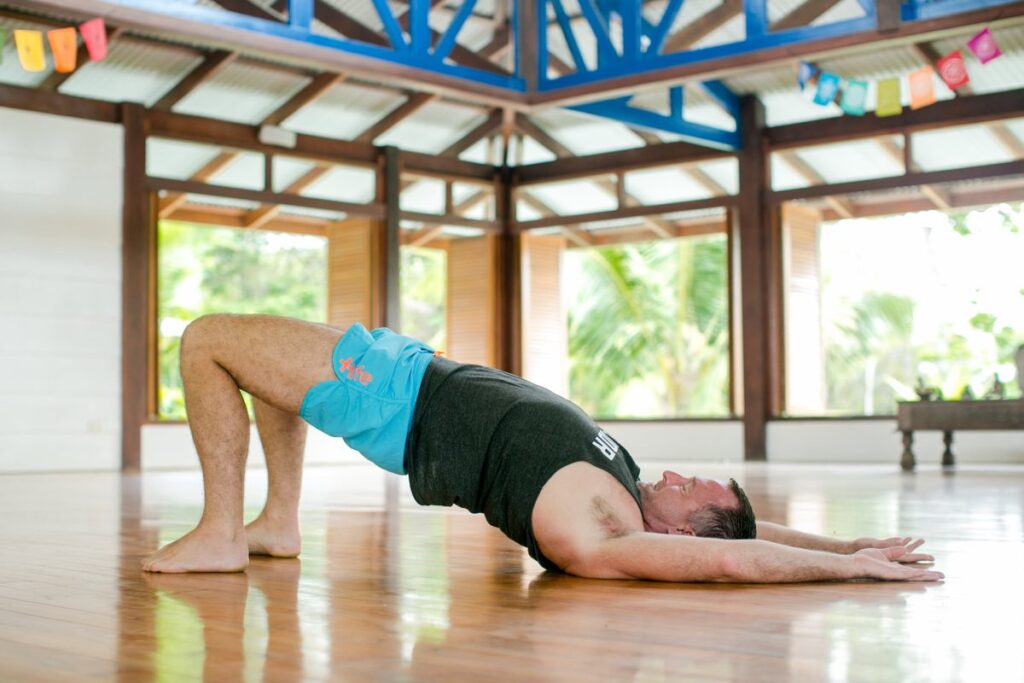
Bridge Pose is one of the most accessible yet powerful yoga poses for back pain, strengthening the entire posterior chain while being safe for most people.
Why This Pose Helps Back Pain
Bridge Pose helps back pain by:
- Strengthening glutes which are often weak and contribute to lower back pain
- Activating hamstrings to support the spine
- Opening hip flexors which can pull on the lower back when tight
- Strengthening the erector spinae muscles along the spine
- Building core stability through the entire trunk
- Being very accessible for all levels with easy modifications
How to Do Bridge Pose
Setup:
- Lie on your back with knees bent, feet flat on floor
- Place feet hip-width apart, heels close to your sit bones
- Arms rest at your sides, palms down
The Movement:
- Press firmly through your feet
- Engage your glutes and lift your hips toward the ceiling
- Keep your thighs parallel (don’t let knees splay out)
- Press your arms into the floor for stability
- Lift until your body forms a straight line from shoulders to knees
- Hold for 5-10 breaths
- Slowly lower down one vertebra at a time
Critical Points for This Pose
DO:
- Engage glutes to lift (not just push with feet)
- Keep knees tracking over ankles
- Press shoulders down into the mat
- Maintain natural neck curve (don’t tuck chin excessively)
DON’T:
- Let knees splay outward
- Lift so high that you compress your lower back
- Hold your breath
Common Mistakes to Avoid
Mistake #1: Knees Falling Apart
Keep thighs parallel. You can place a block between your thighs to practice proper alignment.
Mistake #2: Lifting Too High
Higher isn’t better. Lift until your body is in a straight line—going higher compresses your lower back.
Mistake #3: Not Engaging Glutes
This is a glute-strengthening pose. Actively squeeze your glutes throughout.
Breathing Instructions
- Inhale: Prepare and engage your core
- Exhale: Lift your hips up
- Hold: Maintain steady breathing throughout
- Exhale: Lower back down slowly
Modifications
If you have neck issues:
- Place a folded blanket under your shoulders (not under your neck)
To make it easier:
- Don’t lift as high initially
- Hold for fewer breaths
To make it more challenging:
- Lift one leg at a time (single-leg bridge)
- Place a block between your thighs and squeeze throughout
- Hold for longer (up to 1 minute)
For AYAMA-style activation:
- Hold at the top and pulse up 1 inch for 6 reps
- This builds even more glute strength
7. Bird Dog Pose (Dandayamana Bharmanasana)
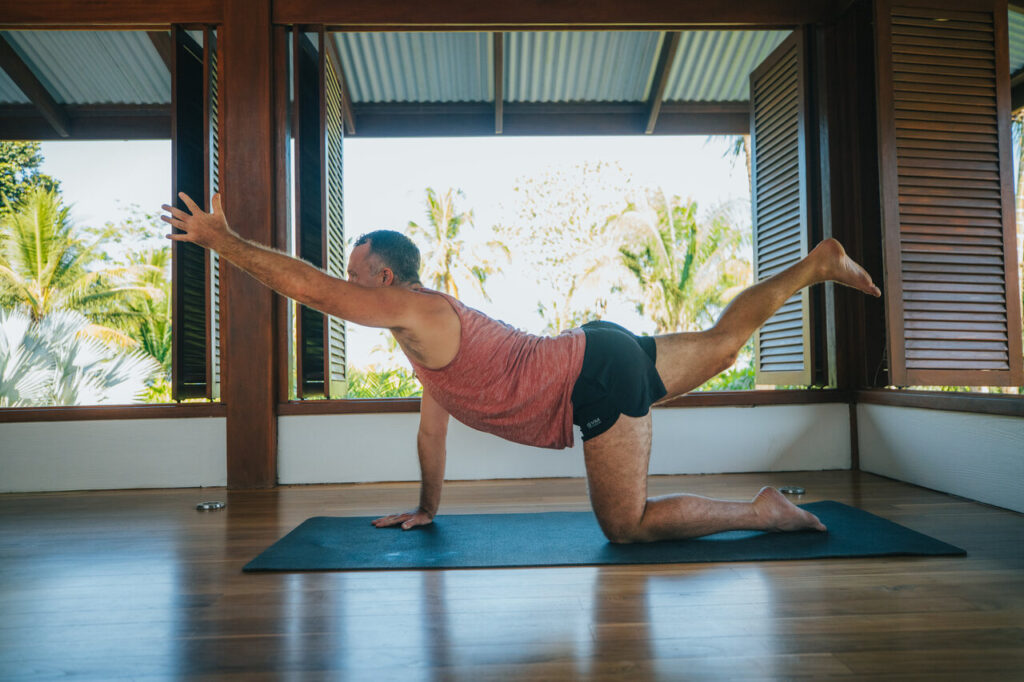
Bird Dog is one of the most effective yoga poses for back pain because it activates the exact muscles that prevent and eliminate lower back pain: the glutes, core stabilizers, and back extensors.
This pose embodies the AYAMA philosophy perfectly—building strength and stability through muscle activation rather than passive stretching.
Why This Pose Helps Back Pain
Bird Dog is exceptional for back pain because it:
- Activates weak glutes which are the #1 cause of lower back pain
- Strengthens core stabilizers including deep abdominal and back muscles
- Builds cross-body coordination and stability
- Improves balance and proprioception
- Strengthens back extensors without compression
- Is highly functional mimicking real-life movement patterns
- Prevents future injury by addressing the root cause of instability
When your glutes and core are weak, your lower back compensates and becomes tight and painful. Bird Dog directly addresses this weakness.
How to Do Bird Dog (AYAMA Style)
Setup:
- Start in tabletop position (hands and knees)
- Place wrists directly under shoulders
- Place knees directly under hips
- Keep spine neutral, head in line with spine
- Engage your core by drawing navel toward spine
The Movement:
- Simultaneously extend your right arm forward and left leg back
- Keep arm and leg parallel to the floor
- Hold for 6 seconds while maintaining stability
- Focus on keeping hips level (don’t let them rotate)
- Slowly return to starting position
- Switch sides: left arm forward, right leg back
- Hold for 6 seconds
- Repeat 6 times per side (alternating)
Critical Points for This Pose
DO:
- Keep hips level and square to the floor throughout
- Engage your core to prevent lower back from sagging
- Extend through your heel and fingertips to create length
- Keep your neck neutral (gaze down at the mat)
- Move slowly and with control
- Breathe steadily throughout
DON’T:
- Let your hips rotate or tilt to one side
- Arch or sag your lower back
- Lift your arm or leg too high (parallel to floor is enough)
- Rush through the movement
- Hold your breath
- Let your shoulder collapse on the supporting side
Common Mistakes to Avoid
Mistake #1: Hip Rotation
This is the most common error. Your hips should stay level and square to the floor. Imagine balancing a cup of water on your lower back—it shouldn’t spill.
Mistake #2: Sagging Lower Back
Engage your core to prevent your belly from dropping toward the floor. Your spine should maintain its natural curve, not sag.
Mistake #3: Lifting Too High
Your extended arm and leg should be parallel to the floor, not lifted higher. Going higher creates compression in your lower back.
Mistake #4: Moving Too Fast
This is about control and activation, not speed. Slow, deliberate movement builds the stability you need.
Breathing Instructions
- Inhale: As you extend arm and leg
- Hold: Maintain steady breathing during the 6-second hold
- Exhale: As you return to starting position
- Keep breathing rhythmic and controlled throughout all reps
Modifications
If you’re struggling with balance:
- Start with just the arm (no leg)
- Or just the leg (no arm)
- Progress to opposite arm and leg as you build stability
If you have wrist pain:
- Come down to your forearms instead of hands
- Or make fists with your hands
If you have knee sensitivity:
- Place a folded blanket or towel under your knees for padding
To increase difficulty (AYAMA advanced):
- At the top of the hold, add small pulses: lift 1 inch higher and lower 6 times
- This builds even more glute and core strength
- Only do this if you can maintain perfect form
For maximum AYAMA benefit:
- Focus on squeezing your glute on the extended leg side
- This activates the muscles that are often weak and causes your back pain
- The glute activation is MORE important than how high you lift
Why Bird Dog is Essential for AYAMA
Bird Dog perfectly demonstrates AYAMA principles:
Addresses weakness, not tightness: Most people with lower back pain have weak glutes and core muscles. Their tight back muscles are compensating for this weakness. Bird Dog strengthens the weak muscles, which allows the tight muscles to finally relax.
Builds stability: Lower back pain comes from instability. Bird Dog creates the cross-body stability your spine desperately needs.
Activates, doesn’t stretch: There’s no passive stretching here—just pure muscle activation and strengthening.
Functional movement: Bird Dog mimics real-life movements like walking, reaching, and lifting. When you strengthen this pattern, you protect your back in daily activities.
This pose is a cornerstone of the AYAMA approach to eliminating back pain at its source.
Want more Bird Dog Instruction? Click here to learn more about this yoga pose for back pain.
Creating Your Back Pain Relief Sequence
Now that you know the best yoga poses for back pain, let’s put them together into an effective practice sequence.
Beginner Sequence (15-20 minutes)
Warm-Up:
- Cat-Cow (6-8 rounds) – 2 minutes
Herniated Disc Support: 2. Sphinx Pose (hold 5-8 breaths) – 2 minutes
Core Activation: 3. Apanasana/Dynamic Knees to Chest (6 reps) – 2 minutes
Gentle Strengthening: 4. Bridge Pose (hold 5-8 breaths, rest, repeat 2x) – 3 minutes 5. Locust Pose (hold 5 breaths, rest, repeat 2x) – 3 minutes
Full Body Strength: 6. Downward-Facing Dog (hold 5-8 breaths) – 2 minutes
Upper Back Release: 7. Thread the Needle (both sides, 5 breaths each) – 3 minutes
Rest: 8. Savasana (final relaxation) – 5 minutes
Intermediate Sequence (25-30 minutes)
Add the following after building strength for 2-4 weeks:
- Longer holds in each pose
- Additional rounds of Locust Pose and Bridge Pose
- More dynamic variations
How Often Should You Practice?
For acute back pain:
- Practice gentle poses (Cat-Cow, Sphinx) daily
- Focus on Apanasana to build core strength
- Keep sessions shorter (10-15 minutes)
For chronic back pain:
- Practice 3-5 times per week
- Gradually increase duration and intensity
- Consistency is more important than length
For prevention:
- Practice 2-3 times per week to maintain strength and flexibility

Frequently Asked Questions About Yoga Poses for Back Pain
Can yoga really help my back pain?
Yes! Research shows that yoga is as effective as physical therapy for chronic lower back pain. The key is focusing on muscle activation and strengthening, not just stretching.
How long before I see results?
Many people experience some relief after their first practice. For lasting results, practice consistently for at least 2-4 weeks. Chronic back pain may take 6-12 weeks of regular practice to significantly improve.
Should I practice yoga poses for back pain when I’m in pain?
For mild to moderate pain, gentle yoga can help. Always start slowly and stop if pain increases. For severe pain, rest and consult a doctor first.
What if the poses hurt?
Some muscle fatigue during strengthening is normal. Sharp pain is not. If a pose hurts, modify it or skip it. Pain is your body’s way of saying “not yet” or “not this way.”
Can I do yoga for back pain every day?
Yes, gentle yoga poses for back pain can be practiced daily. More intense poses should be practiced with rest days in between.
What’s the difference between AYAMA and regular yoga for back pain?
Traditional yoga often focuses on stretching tight muscles. AYAMA focuses on activating weak muscles that are causing the tightness—addressing the root cause instead of the symptom.
Do I need any special equipment?
A yoga mat is helpful but not required. You can practice on a carpeted floor. A folded blanket or towel can provide extra cushioning.
Can yoga poses for back pain prevent future problems?
Absolutely! Building strength and stability through these poses is one of the best ways to prevent back pain from returning.
The Blue Osa Approach to Back Pain Relief
At Blue Osa Yoga Retreat in Costa Rica, we’ve developed a comprehensive approach to back pain that goes beyond these poses.
Applied Yoga Anatomy + Muscle Activation (AYAMA™)
Our AYAMA methodology, created by Yogi Aaron, revolutionizes how we understand and treat back pain:
The AYAMA Philosophy:
- Back pain stems from weak, inactive muscles—not tight ones
- Stretching tight muscles without activating weak ones makes pain worse
- Muscle activation restores the brain-muscle connection
- Building stability eliminates pain at its source
Stop Stretching: A Revolutionary Approach
Yogi Aaron’s book “Stop Stretching!” challenges everything conventional yoga teaches about back pain.
Key principles:
- Tight muscles protect weak, unstable muscles underneath
- Passive stretching disrupts the neuromuscular connection
- Isometric muscle activation rebuilds strength and stability
- A stable body equals a pain-free life
Our Back Health Programs
Back Health Online Course: Learn the AYAMA approach to eliminating back pain from home with guided video instruction.
Yoga Teacher Training: Dive deep into Applied Yoga Anatomy and learn to teach back-safe yoga that actually helps people.
Private Sessions: Work one-on-one with AYAMA-trained instructors to address your specific back pain issues.
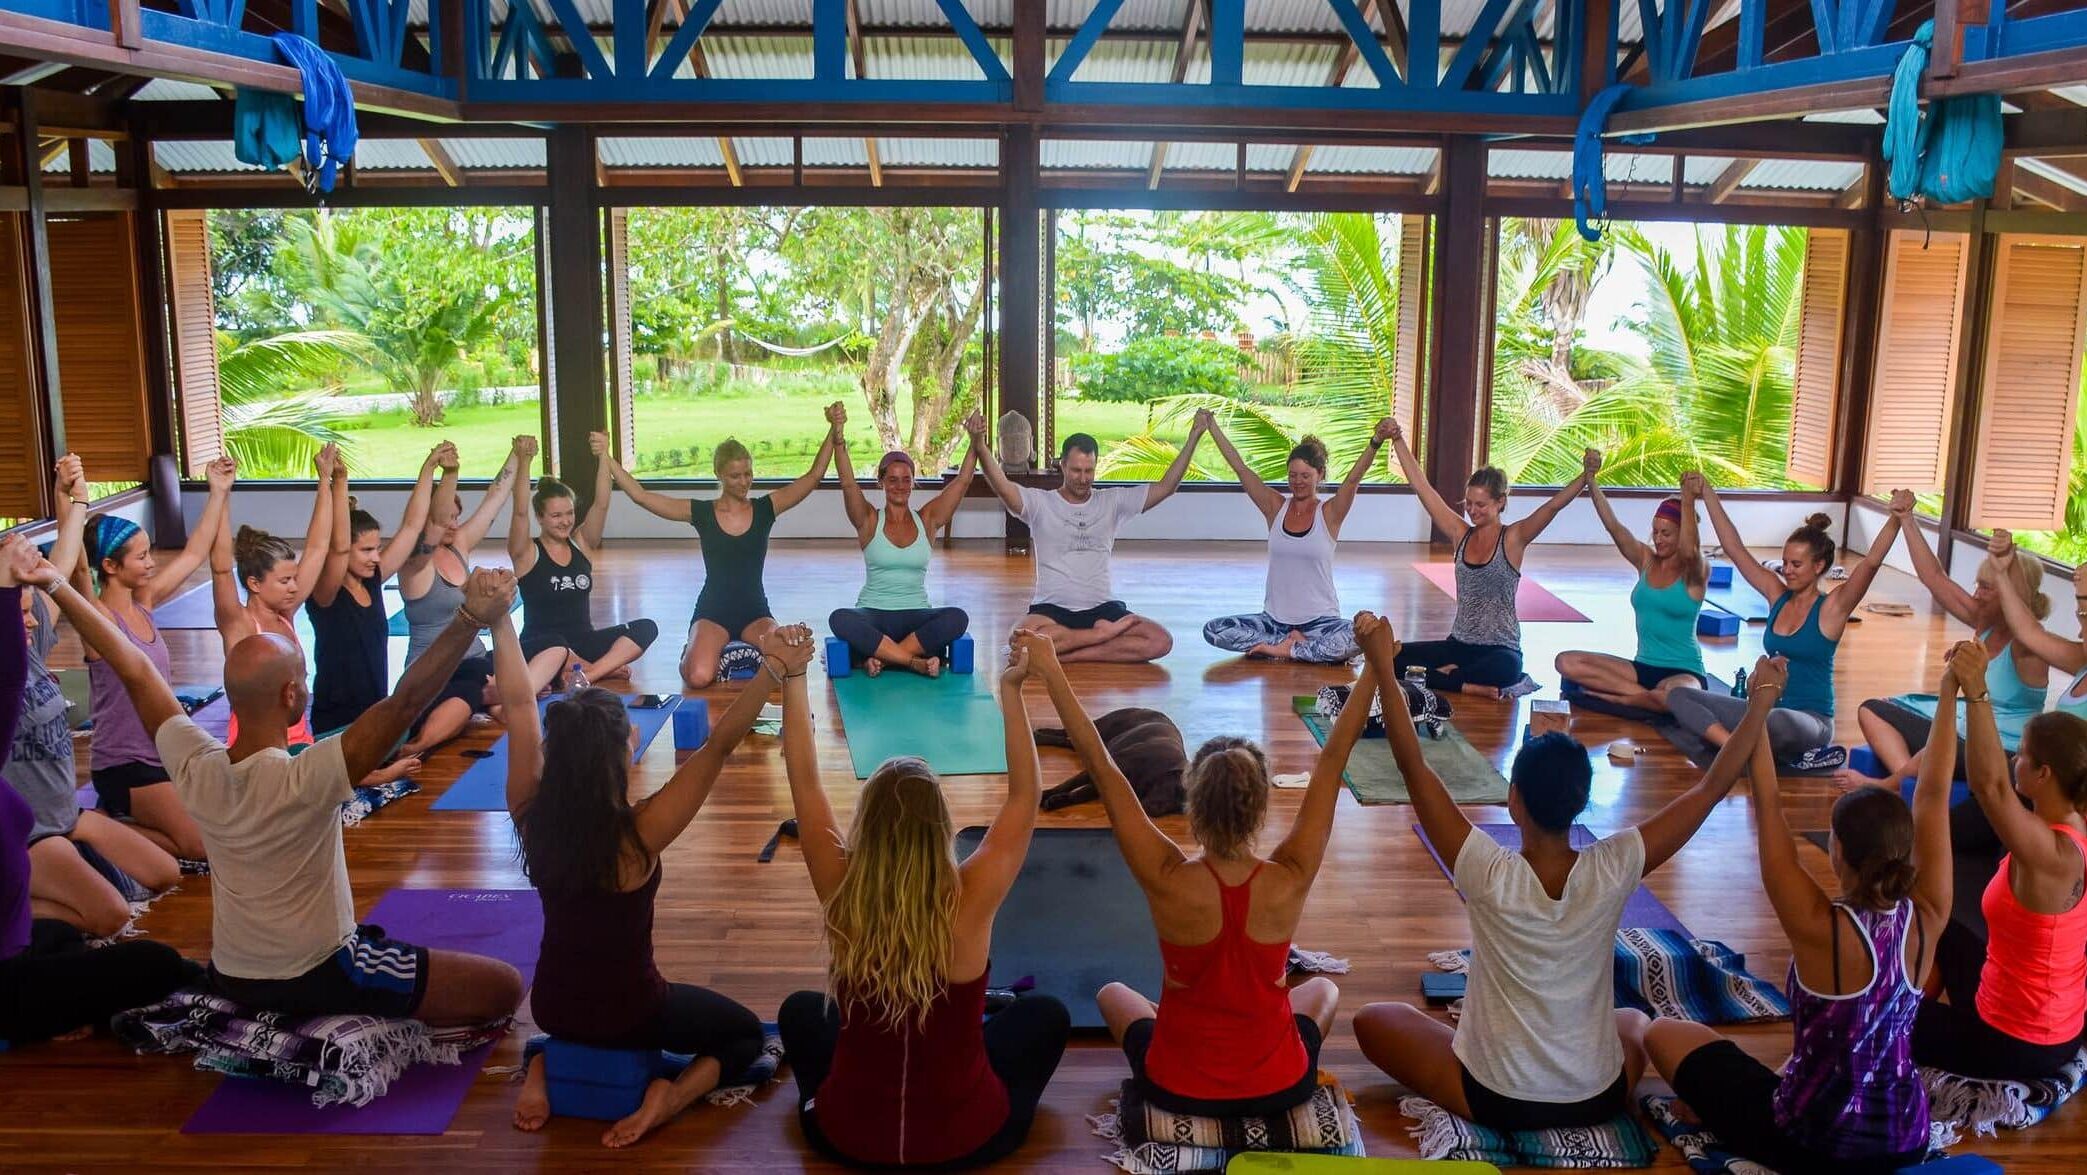
Wellness Retreats: Experience immersive healing in Costa Rica with daily yoga, AYAMA sessions, and personalized attention.
Your Next Steps to a Pain-Free Back
You now have the knowledge and tools to begin your journey to back pain relief through yoga.
Here’s what to do next:
- Start with the Beginner Sequence – Practice 3-4 times this week
- Begin with Sphinx Pose – Especially if you have disc issues
- Focus on Apanasana – This core-activating pose is foundational
- Be consistent – Regular practice beats occasional intense sessions
- Listen to your body – Modify as needed and never force pain
- Track your progress – Notice improvements in pain levels and mobility
Remember: Healing takes time. Be patient and compassionate with yourself.
Ready to Go Deeper?
If you’re serious about eliminating back pain for good, consider:
Learn from the Expert:
- Read Yogi Aaron’s “Stop Stretching!” book
- Watch our Back Health video series
- Join our online AYAMA community
Experience Blue Osa:
- Book a wellness retreat in Costa Rica
- Enroll in yoga teacher training to master AYAMA
- Schedule a virtual consultation with our team to learn more about YTT.
The yoga poses for back pain in this guide are powerful—but they’re just the beginning.
The AYAMA approach offers a complete system for building a strong, stable, pain-free body that serves you for life.
Your back pain doesn’t have to be permanent. The path to relief starts with a single practice.
Ready to begin your pain-free journey?
Disclaimer: This article is for educational purposes only and is not a substitute for medical advice. Always consult with a healthcare professional before beginning any new exercise program, especially if you have existing back problems or injuries.
About The Author, Yogi Aaron

Yogi Aaron is the founder and creator of Applied Yoga Anatomy + Muscle Activation™ (AYAMA), a revolutionary methodology that challenges conventional approaches to yoga. Using a science-backed approach, he prioritizes muscle activation over traditional stretching.
With over three decades of dedicated study, mentorship, and hands-on experience, he has established himself as a leading expert in yoga therapy, alignment, and pain-free movement.
As owner and operator of Blue Osa Yoga Retreat + Spa in Costa Rica, Yogi Aaron leads transformative programs that combine his expertise in yoga instruction, retreat facilitation, and wellness business operations. His work spans both in-person immersive experiences and digital education through The Yogi Club online platform and the AYAMA™ Certification Program.
Yogi Aaron’s teaching methodology represents a paradigm shift in modern yoga practice. AYAMA focuses on activating and engaging muscles to enhance range of motion, build strength, improve stability, and optimize alignment—while reducing pain and injury risk. This evidence-based approach has positioned him as a thought leader challenging the status quo in the yoga community.
His mission extends beyond the mat: to liberate individuals from chronic pain and guide them toward discovering yoga’s authentic purpose through intelligent, body-informed practice.
Learn more about training opportunities with Yogi Aaron at Blue Osa Yoga Retreat + Spa.
Read More about Applied Yoga Anatomy + Muscle Activation
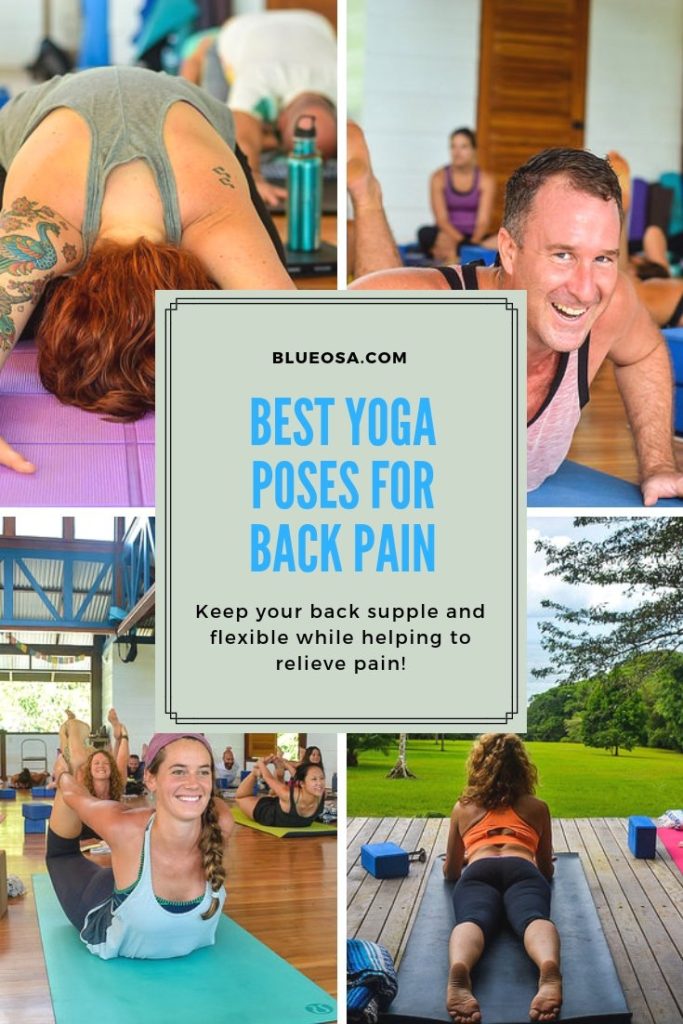
Pin it for later!
Citations for lower back bain and sphinx pose:
1. Total Ortho Sports Medicine Study:
- URL: Link to the Total Ortho Sports Medicine Study article
- Citation text: “modified sphinx pose…help release tight hips and hamstrings, lower mechanical stress on the lumbar segments, and improve segmental mobility”
2. McKenzie Method Research (Primary Study):
- URL: Link to the McKenzie Method Research (Primary Study)
- Title: “Impact of McKenzie Method Therapy Enriched by Muscular Energy Techniques on Subjective and Objective Parameters Related to Spine Function in Patients with Chronic Low Back Pain”
- Key finding: “Implementation of McKenzie method…was associated with a significant decrease in Oswestry Disability Index, significant alleviation of pain (VAS), and significantly reduced size of spinal disc herniation”
3. Spontaneous Disc Regression Study:
- URL: Link to the Spontaneous Disc Regression Study article
- Title: “The probability of spontaneous regression of lumbar herniated disc: a systematic review”
- Key finding: “The rate of spontaneous regression was found to be 96% for disc sequestration, 70% for disc extrusion, 41% for disc protrusion, and 13% for disc bulging”
4. McKenzie Method Mechanism:
- URL: Link to the McKenzie Method Mechanism Article
- Explanation: How extension exercises work: “pushing the disc pressure forward, creating suction. This can also pull the disc material into the disc”
5. Yin Yoga Documentation:
- Link to the Yin Yoga Article
- Quote: “People with bulging or herniated disks may find this very therapeutic”
Book/Inquire Now
Got pain? This will help you!

YOU DESERVE TO LIVE PAIN-FREE...
Receive 7 short, simple, and effective practices to alleviate knee, hip, low back, neck, shoulder pain, and more!
All you need is 5 minutes per lesson and it's FREE!
This revolutionary approach to yoga is new, and no one else is teaching this! Since I created Applied Yoga Anatomy + Muscle Activation™ and started teaching it consistently, I've witnessed students heal long-standing injuries, access yoga postures they never thought possible, and tell me over and over again how their body just feels better.
I hope you'll join me on this journey!
~Yogi Aaron

Is Yoga Teacher Training Right For Me?
We Created This FREE 5 Part Series So You Can Get All The Information To Make The Right Choice.
In this series, you will learn:
-
- Am I a candidate for yoga teacher training??
-
- What will I learn in a YTT?
-
- Do I need to have a perfect downward dog to attend YTT?
14-Day 200-Hour Yoga Teacher Training in Costa Rica
If you are looking for a 14-day 200 hour Yoga Teacher Training Costa Rica Immersion, you have landed in the right place. Join the next one!
300-Hour, 28-Day Yoga Teacher Training

Do You Feel Called To Something Greater?
This 300-Hour Yoga Teacher Training immersion training at Blue Osa will immerse you in yoga for one month.
You will have the specific transformational skills and yogic practices you need in order to connect with your higher purpose.
And more! You will be able to offer these transformative skills to others!